
PREPARING PLANT FIBRES FOR NATURAL DYEING

INTRODUCTION
The success of your natural dyeing project will depend on how well the fibres are prepared. To get rewarding and even dye results it’s necessary for fibres to be clean and free of any impurities, such as the sizings used in the manufacturing process. This cleaning is known as ‘scouring’, which sounds a little drastic but really just means washing thoroughly.
NB: you can only dye 100% natural fibres with natural dyes. Synthetic and mixed fibres will not respond well to natural dyeing.
Plant fibres such as linen, hemp and cotton are generally more robust than animal fibres such as wool, alpaca and silk, and will withstand higher temperatures and firmer handling.
The preparation of plant and animal fibres is slightly different. For this blog I’m focusing on how to prepare plant fibres for natural dyeing and I’m using linen, banana and cotton samples.

WEIGHING
Always weigh your dry fibres before getting started, so you can gauge how much dyestuff etc you’ll need. My three sets of fibre samples weigh a little under 150g in total.

WETTING-OUT
All fibres need to be well soaked, or ‘wetted out’, to prepare them for dyeing. Leave them in cold water for at least a couple of hours, or preferably overnight, to be sure the fibres have opened up, making them more receptive to the next steps.

SCOURING
To scour plant fibres you need a pH neutral detergent such as EcoZero and a little soda ash (washing soda). This is an alkaline salt that will help the cleaning process.
Knowing the dry weight of your fibres means you can calculate how much of each is necessary. I use 2% of detergent to weight of fibre (WOF) and 5% of soda ash. SO: for 150g fibre:
150g ÷ 100 x 2 = 3g of deterrent (about 1 teaspoon)
150g ÷ 100 x 5 = 7 ½g of soda ash (about 2 teaspoons)

Add the detergent and soda ash to a pot of warm water and stir well to dissolve the soda ash. Add the fibres, making sure there is plenty of room for them to move freely. Heat the pot slowly to about 90C, which is a gentle simmer, and hold at this heat for a couple of hours. Then remove from the heat and leave the fibres to cool in the pot. I leave them overnight.

You can see from the colour of the water why scouring is necessary! Rinse the fibres well before moving on to the next stage.
PRE-MORDANTING
There is no natural affinity between fibres and most natural dyes. With a few exceptions it’s necessary to create a bridge between the fibre and the dye, and this is known as ‘mordanting’ – a word derived from the latin mordere, meaning to bite.
In the case of plant fibres, mordanting is done in two stages; first with a tannin bath, which I refer to as a pre-mordant, and then with an alum mordant. (You will sometimes see the term ‘pre-mordant’ referring to the whole mordanting process, which is a little confusing.) For this project I’m using two different sources of tannin.

Oak galls are a popular source of tannin because they impart less colour to the fibres than some alternatives, so have less influence on the final dye result. Oak galls, as the name suggests, grow on oak trees and are created when the oak gall wasp (there are many different species) lays its eggs on the tree. The developing lavae induce the tree to produce abnormal growths, or galls, which are rich in tannin. You can often see the pinprick hole in the gall through which the tiny new wasp emerged. Oak galls are not always easy to find in quantity, but gallnut extract in powder form is readily available from craft suppliers.

Another rich source of tannin is myrobalan, the ground nut of the Terminalia chebula tree which grows in warm, humid climates and is widely used in India and SE Asia both as a yellow dye and as a mordant. It is darker than tannin derived from oak galls and this is often reflected in the shade of the final dye results.

I added 10% WOF of gallnut powder and 20% WOF of the myrobalan powder to cold water, allowing them a few minutes to hydrate. Jam jars with well-fitting lids are useful for this, and you can give them a good shake to help the process along. NB: as with handling any fine powders a mask is recommended, and keep lids on pots where possible.
 I then added the two different tannin solution to two different pots of warm water (about 50C), gallnut on the left and myrobalan on the right, and stirred them well before adding the fibres.
Joy Butrup and Catharine Ellis, in their fascinating book 'The Art and Science of Natural Dyes', explain that 'There is an equilibrium between the amount of tannin on the fibre and the amount of tannin in the water. The success of the tannin bath is dependent on the correct amount of water and tannin'. They recommend 30:1 water:textile ratio. As my three sample sets weigh 50g each I used 1.5 lites of water in each tannin bath (50g x 30 = 1500ml).
NB: 1kg = 1 litre (which is the same as 1000g = 1000ml)
The fibres were left to steep for a couple of hours as they cooled. It’s important to move the fibres around from time to time to ensure an even uptake of the tannin. This is particularly important with pieces of fabric which tend to fold over, creating uneven results. Boutrup and Ellis advise that tannin does not fix in the fibres until added to an alum solution, so rinse the fibres only very lightly after removing them from a tannin bath.

Iron can be used as an alternative to tannin and improves the colourfast quality of the final result. Being harsh on fibres it’s better suited to plant than animal fibres and is used to darken, or ‘sadden’, natural dye colours.
You can easily make your own iron water by adding some bits of rusty iron to a solution of water and vinegar and leaving it for a month. This produces Ferrous acetate. Here I’m using Ferrous sulphate purchased from a craft supplier and you need very little of this; just half a teaspoon added to a pot of warm water is enough to create an effective iron bath. A stronger solution will give darker results.
The sample fibres were added to the warm iron bath and left to steep for just a few minutes.
 The results clearly show the difference in colour between the three pre-mordants
MORDANTING
While your fibres are steeping in the tannin bath you can be preparing the next step in the mordanting process. Alum (potassium aluminium sulphate) is considered to be a non-toxic mordant but can be an irritant to eyes and skin, so gloves and a mask are recommended. Its use in dyeing is first recorded by the Greeks in the 5th century BCE and it’s been an important element of the natural dyeing industry ever since.

The acidic nature of the alum is offset by the addition of a little soda ash. Jam jars with well-fitting lids come in handy again here. Alum crystals need kettle-hot water to help them dissolve, and a good shake, so you’ll need a pair of rubber gloves. Use 12% of alum and 2% of soda ash to WOF.

Add the alum to a pot of warm water (about 50C), followed by the soda ash which may bubble up a little. Stir well and then add the fibres. Stir the alum bath from time to time to ensure an even absorption by the fibres. After a few minutes it may look as though the alum and soda ash are separating out, but in fact this is the result of a white precipitate of aluminium hydroxide and the solution just needs to be stirred from time to time.
 Leave the fibres to steep for a couple of hours as the solution cools. I allow them to hang overnight before rinsing thoroughly.
NB: it can be helpful to prepare fibres for natural dyeing in large batches. After mordanting, hang the fibres to dry out and store them unwashed for later use. They can then we washed as needed, wetted-out again and be quickly ready for your next dyeing project.
DYEING
With the fibres weighed, wetted-out, scoured, pre-mordanted with tannin or iron and mordanted with alum it was time to create a dye bath!

I decided to make use of a bag of yellow onion skins given to me by a thoughtful friend. I used 100% WOF, poured a couple of kettles of hot water over the dry skins and left them overnight to soften up and start to release their colour. (For fuller details on creating and using a natural dye bath see one of our earlier blogs such as Natural Dyeing with Yarrow.)

The onion skins were heated as necessary and then strained through a muslin-lined sieve.

All the fibre samples were then entered together into the one dye bath, heated and left to steep for a couple of hours before hanging overnight and washing.
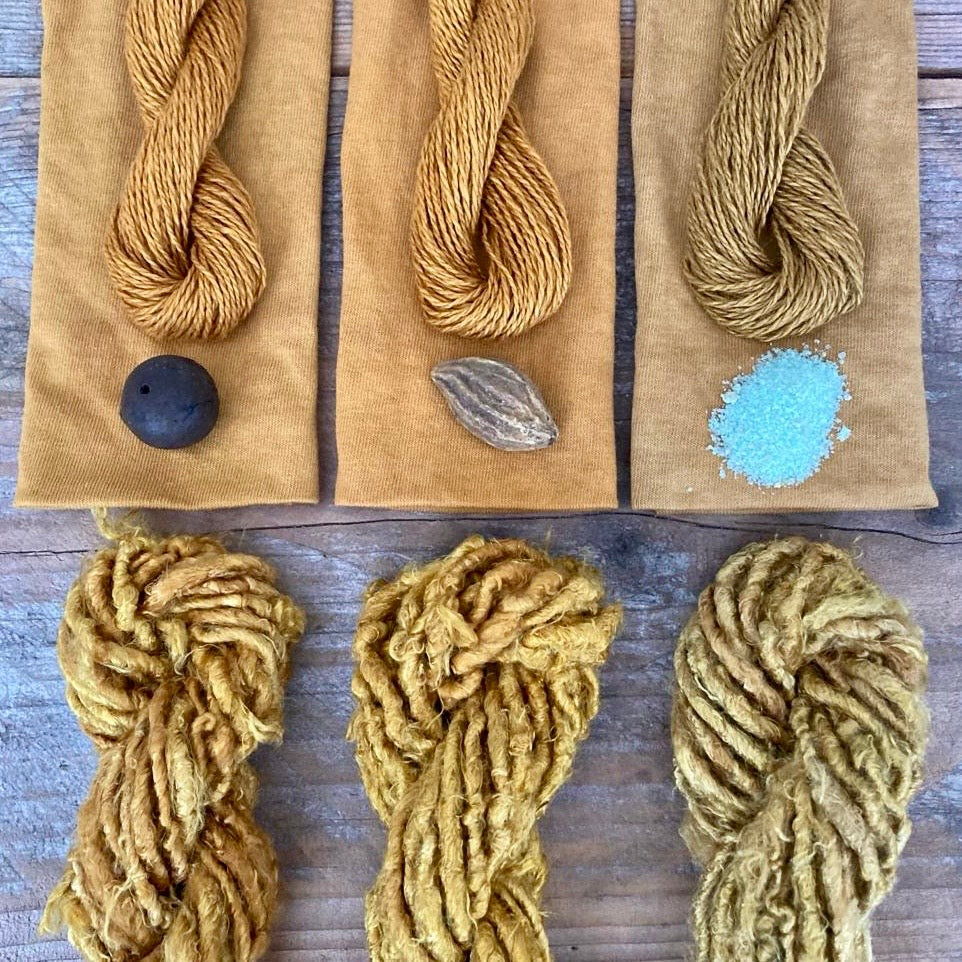
RESULTS

There is surprisingly little difference between the fibres that were pre-mordanted with gallnut powder (left) and those that were pre-mordanted with myrobalan powder (middle). This is probably due to the fact that onion skins also contain tannin which will have offset the difference in colour. There is however a noticeable difference between these and the samples pre-mordanted with iron (right).
NB: both tannin and alum baths can be topped up by 50% and used again. And there are other good sources of tannin such as rhubarb leaves and the leaves of the Stagshorn Sumac tree, Rhus typhina, (below), which is unmistakable with its prominent 'horns' and its fiery orange autumnal leaves. 
For more information on natural dyeing, take a look at our in-person natural dying workshop, and our self-paced, online 'Introduction to Natural Dyeing'.