
INDIGO - KING OF DYES
INDIGO – KING OF DYES
How to prepare, use and maintain an indigo vat.
INTRODUCTION

Indigofera tinctoria
Indigo is truly the King of Dyes. Dyeing communities around the world have been extracting this intense, natural blue pigment from the leaves of the Indigofera plant for millennia. The oldest known indigo-dyed textile in the world was found at an excavation site in Peru in 2009, and is believed to be over 6000 years old.
Indigofera is a large genus of over 750 species of flowering plants belonging to the pea family, Fabaceae. They are widely distributed throughout the tropical and sub-tropical regions of the world and the use of indigo as a natural dye crosses continents and cultures. What all these plants have in common is the presence of indigotin, a dark blue crystalline compound.
The dominant species in the Indian sub-continent is Indigofera tinctoria, also known as ‘true indigo’ and, until the development of synthetic indigo at the beginning of the 20th century, the production of indigo was an important industry, sometimes referred to commercially as ‘blue gold’. India was a primary supplier of indigo to Europe as early as the Roman period and, as a pigment, it was used for painting, medical and cosmetic purposes.
As a dye, Indigotin pigment is not soluble in water so the dye bath, known as a ‘vat’, has to be ‘reduced’. This means reducing the amount of oxygen in the vat so the double oxygen bonds of the indigotin pigment are changed into single bonds, making it possible for the indigotin molecule to dissolve in the vat and so create a dye that can be taken up by textiles. Once exposed again to oxygen the process is reversed, making the indigotin insoluble again and resulting in a strong, colourfast dye.
Indigo’s temperate climate cousin, Isatis tinctoria, or ‘woad’, was an important source of blue dye throughout Europe until the opening of trade routes with India in the 16th C. But Indigofera tinctoria, with its higher concentration of indigotin offering the possibility of darker blues, gradually took over and remains the most commonly used natural blue dye today.

There are various ways of creating an indigo vat, but the one I favour was developed by Marcel Garcia, a natural dyer and researcher based in Provence in France. The 1-2-3 indigo vat method he developed is based on ancient practices which avoid the need for environmentally harmful chemicals, and is made up of:
1 part indigo powder processed from Indigofera tinctoria
2 parts calcium hydroxide (also known as pickling lime), the alkali material used to raise the pH of the vat.
3 parts: fructose, the plant sugar used to reduce the oxygen of the vat.
(see below for suppliers)
Joy Boutrup, a textile chemist, and Catherine Ellis, a textile artist, have worked with Marcel Garcia and together they produced an invaluable natural dyeing book; The Art and Science of Natural Dyes. This book tells you not only what to do but why, which is fascinating. The following is based on their advice.
An indigo vat needs to be highly alkaline, with a pH level of about 12, to activate the reduction process. This is done here with calcium hydroxide. Because of its high pH level an vat indigo is better suited to dyeing plant (cellulose) fibres rather than more delicate animal (protein) fibres. However, once the vat has been reduced the pH level will gradually fall and can be used for dyeing animal fibres once it has dropped to about pH10.

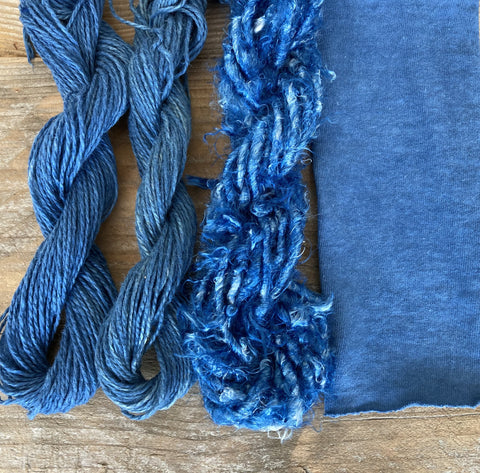
For this project I’m using only plant (cellulose) fibres, left - right: bleached linen, natural linen, banana yarn and cotton.
There is no need to mordant fibres to be dyed in an indigo vat, but they must be scoured and wetted out, see January 2024 blog How to prepare plant fibres for natural dyeing.
Once dyed with indigo the fibres would then need to be mordanted for over-dying with another natural dye, eg a yellow to achieve bold greens.

A vat can be any size depending on the amount of fibre you plan to dye, but it must have a lid and there must always be enough water for the fibres to move freely. Left to right: 20 litre, 5 litre and 3 litre pots.

I can't write about indigo without including this picture of an indigo dyeing day with Vanessa Rolf, using an 80 litre dustbin.

For this relatively small amount of fibre I’m using a 5 litre stainless steel pot / vat. Once the vat has been prepared, but before immersing the fibres, it’s important to place something like this vegetable basket to sit in the bottom. This will prevent the fibres from coming into contact with the sediment that sinks to the bottom of the vat.

Indigo being the potent dye it is, you’ll need some dedicated equipment that isn't used for other dyeing projects. Gloves are essential if you don’t want to be mistaken for a ‘Jumbly’! (see below)
The following is a suggested list of items:
- gloves
- mask
- long-handled spoon or similar for stirring
- sieve
- scales
- measuring jug
- pot and marbles
- thermometer
- pipette
- pH reader
- jam jars with lids are always useful
NB: equipment used for any natural dyeing should always be kept separate from kitchen items.

Depending on the shade you’re aiming for, you need 1g – 10g of indigo for each litre of water. So for a 5 litre vat of water you would need around:
5g of indigo for pale blue shades
25g of indigo for mid blue shades
50g indigo for darker blue shades
For my 5 litre vat I’m using 25g of indigo powder, aiming for a mid blue shade. That means, based on the 1-2-3 principle, I’ll need:
25g of indigo
50g calcium hydroxide
75g of fructose
PREPARING THE VAT

The first step in preparing an indigo vat is to create a concentrate with the indigo powder and warm water.
NB: always wear a mask when handling powders
Weigh out the indigo powder and fill the pot to ⅔ full with tap-hot water (about 60C).
Add a few marbles and allow the indigo to hydrate for half an hour. Making sure the lid is fitting tightly, shake the pot well several times during this period to help break down the indigo.

Meanwhile half-fill the vat with water, and heat it to about 90C. Hot water contains less oxygen than cold water and will speed up the reduction of the vat. Add the 75g of fructose and stir well to dissolve.

Pour the indigo concentrate into the vat, catching the marbles in a sieve.

Wearing a mask, weigh out the calcium hydroxide into a jam jar with a well-fitting lid. This is a fine powder and will easily puff up into the air. Carefully add enough COLD water to allow it to hydrate thoroughly before adding it to the vat. Calcium hydroxide is ‘exothermic’ (releases heat) and does not dissolve well above 25C.

Add the calcium hydroxide to the vat and top it up with warm water, leaving enough space to add the fibres without it spilling over..

Stir the contents of the vat well with a firm but steady movement, starting at the outer edge and working inwards, creating a vortex. Make sure to stir up the sediment off the bottom of the vat but try not to introduce too much oxygen. Cover with a lid and leave for an hour.
 Stir the vat again, and then 2 or three more times over the next 24 hours, before leaving it to reduce for a couple of days. A pH reader will confirm that the pH is sufficiently high to activate the reduction process - a little over pH12 in this case
NB: it is possible to buy ‘pre-reduced’ indigo that will take less time to reduce.

A healthy vat will have a metallic surface of unreduced indigo and a central ‘flower’ or ‘bloom’ of bubbles.

The contents of the vat will have become a clear liquid the colour of tea (a pipette is helpful here). The more indigo that was used the darker the colour. At this stage it's known as ‘leuco’ from the ancient Greek word ‘leucos’, meaning white or colourless.
USING THE VAT

Remove the ‘flower’ from the vat …

… and gently lower in the metal basket

Because hot water contains less oxygen than cold water, it’s a good idea to soak the fibres for a few minutes in warm / hot water, then give them a squeeze before lowering them into the vat.

It’s important to keep the fibres below the surface and to move them around gently to ensure an even uptake of the dye but again, try to avoid introducing air into the vat.
Fibres should be left in the vat for 20 minutes to allow the dye time to penetrate. Work the fibres around gently once or twice more during this period.
More than one dip will be needed to build up the colour and produce a solid, even dye result. Best results are achieved using multiple dips in the vat rather than a stronger indigo solution.

Remove the fibres from the vat and dunk them briefly in cold water before hanging them up, to remove any loose bits that may be sticking to them.

The fibres are a greenish colour when they first emerge from the vat, and gradually turn blue. They should be left for at least 45 minutes between dips in the vat, to allow the indigo to fully oxidise and for the colour to develop.

Fibres one hour after their 1st dip in the vat.
Having been disturbed, the vat will now be a murky blue and I prefer to leave it to settle for a while between dips, until it clears again. Give the fibres a light rinse between dips.

Fibres one hour after their 2nd dip in the vat.

Fibres one hour after their 3rd dip in the vat.
After three dips the fibres have developed a more solid blue, but further dips will improve the evenness of the dye result. Depending on the depth of colour you’re after, it’s not unusual to do up to eight or more dips.

Following the advice of Boutrup and Ellis I then ‘neutralise’ the high pH of the indigo-dyed fibres by adding them to an acidic vinegar solution and allowing them to steep for 15 – 30 minutes; 1 tablespoon of white vinegar for 1 litre of water. This process also brightens the colour. Then rinse the fibres thoroughly before the next step.

I then reheat the fibres with a little detergent. Being plant (cellulose) fibres they can withstand simmering and this swells the fibres allowing the indigo to penetrate farther inside the fiber, and combine into larger units, thus improving colourfastness. It also removes the surface dye and reduces the blue’ rub-off’ that can be a problem with indigo-dyed fibre that has not been finished properly.
Simmering the fibres also reduces the amount of time and water needed for the final rinsing – though this can take a while. One should ideally keep rising until the water runs clear, but indigo is persistent!

When planning your dyeing always allow for the fact that once fibres have dried they will be several shades lighter than they were when they emerged from the vat, or any dye bath.
MAINTAINING THE VAT
Indigo is expensive to buy but it does keep on giving. It’s possible to continue using a vat for some time before the indigo itself needs replenishing. But in order to maintain a viable vat it’s necessary to keep the three ingredients in balance: indigo, calcium hydroxide and fructose.
- The colour will speak for itself, so just add more indigo concentrate as needed.
- When adding more indigo use a digital pH reader to check the pH of the vat and add more calcium hydroxide if it's dropped.
- If the vat isn't reducing as it should to a clear ‘leuco’ then it’s probably time to add some more fructose.
Some of this is trial and error. Confidence comes with experience and I learn something new with every new vat.
Final results left to right; bleached linen, natural linen, banana yarn and cotton.
TAKE AWAYS:
- I was interested to see that the bleached and natural linens dyed to much the same colour, though the bleached linen is slightly brighter.
- Both the linen samples could have done with a couple more dips to attain a more even dye result
- the cotton sample has taken the indigo dye very well after three dips
- banana yarn always tends to be a bit patchy, but it has retained it's natural lustre and I love the electric blue!
References:
thehistoryblog.com
thecrucible.org
wikipedia.com
britannica.com
gardeningknowhow.com
The Art and Science of Natural Dyes, Boutrup, J and Ellis, C
(Schiffer Publishing Ltd, Atglen, 2018).
naturalldyeworkshop.com Maintaining and Troubleshooting an Organic Indigo Vat.
Material sources:
dyeing-crafts.co.uk
georgeweil.com
wildcolour.co.uk
sourcechemicals.com
apcpure.com
buywholefoodsonline.co.uk
realfoodsource.com
The Jumblies by Edward Lear (1812 – 1888)
They went to sea in a Sieve, they did,
In a Sieve they went to sea;
In spite of all their friends could say,
On a winter’s morn, on a stormy day,
In a Sieve they went to sea!
And when the Sieve turned round and round,
And everyone cried, “You’ll all be drowned!”
They cried aloud, “Our Sieve ain’t big,
But we don’t care a button, we don’t care a fig!
In a Sieve we’ll go to sea!”
Far and few, far and few,
Are the lands where the Jumblies live;
Their heads are green and their hands are blue,
And they went to sea in a Sieve.