
HOW TO MAKE PAINT FROM FORAGED FLEABANE
WATERCOLOUR PAINT

FLEABANE (Pulicaria dysenterica)
Common Fleabane, a native to Europe and Asia, is in the daisy family (Asteraceae). Growing up to a meter tall it can easily be spotted in the hedgerows in late summer, between the end of July and September, where it favours damp conditions alongside ditches.

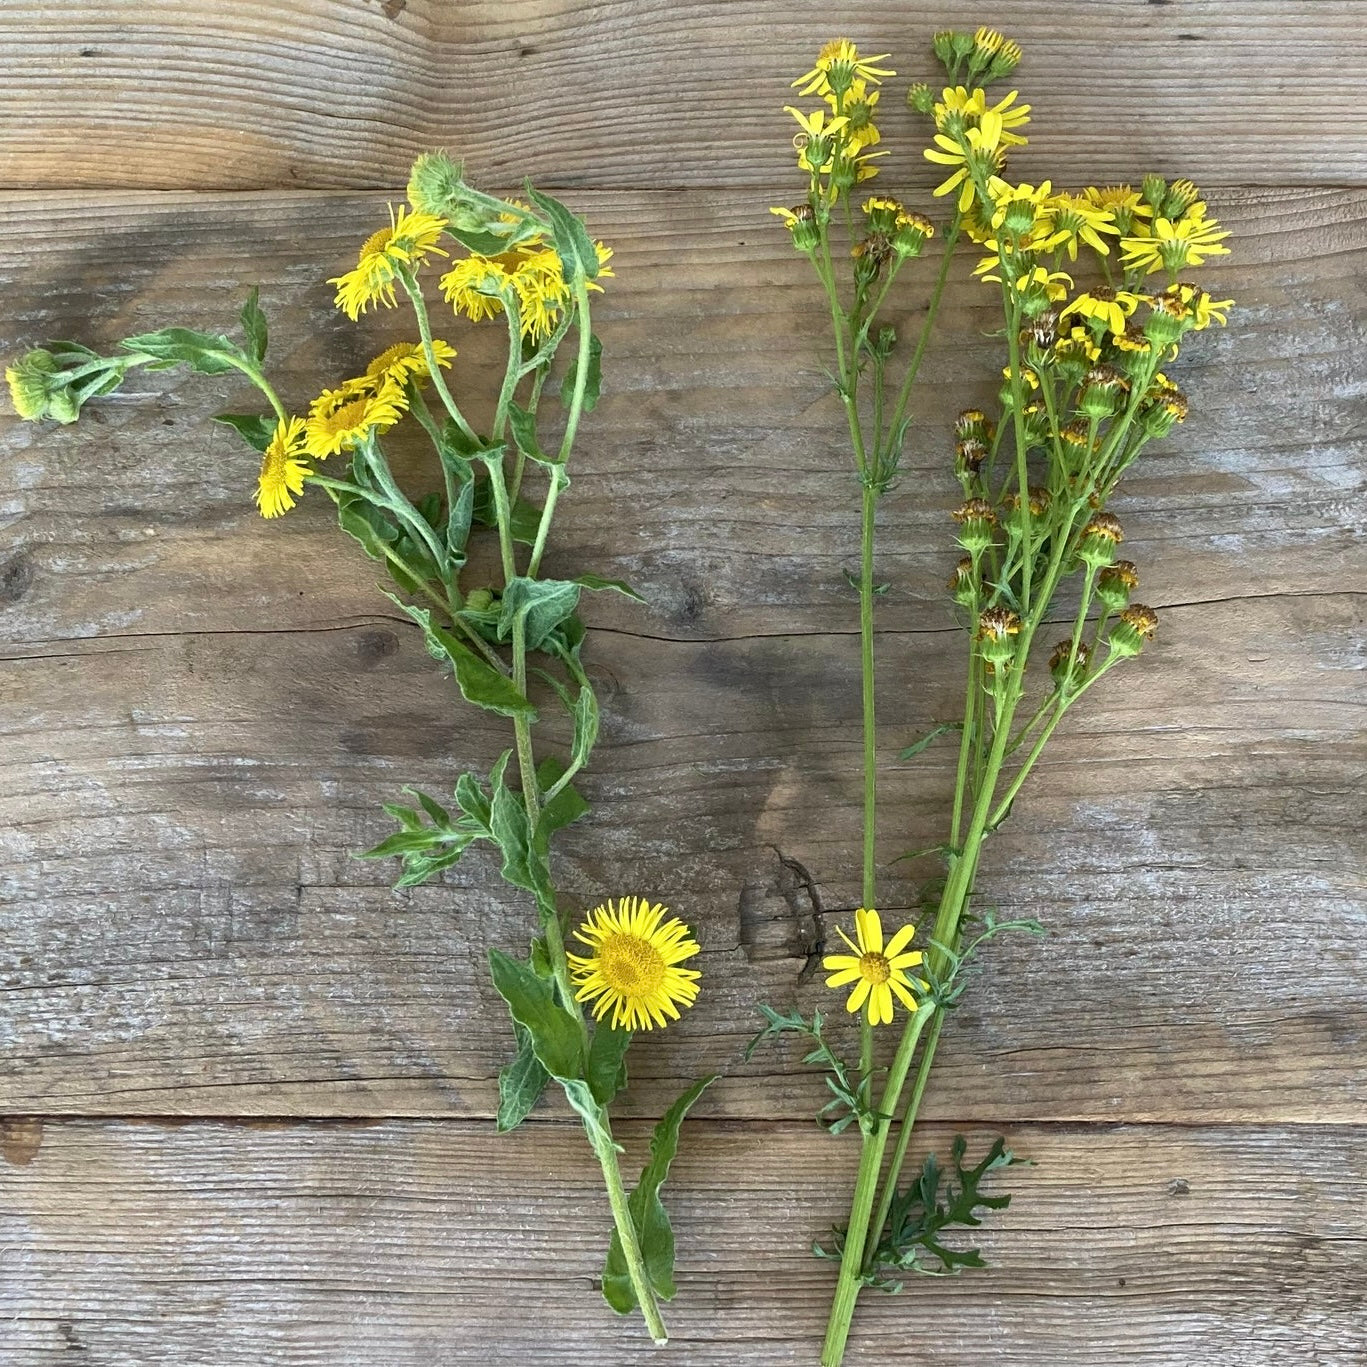
Fleabane and Ragwort
Its bright yellow flowering heads could be mistaken at first sight for Ragwort (Senecio jacobaea), but a closer look at both the flower and the leaves will quickly tell them apart. These two were found growing along the same stretch of a lane near my home in Wiltshire.
As its common name suggests, Fleabane was reputed to deter fleas and the word ‘pulicaria’ comes from the Latin for flea – ‘pulex’. Historically it had various medicinal uses including as a diuretic, a treatment for gout and, of course, dysentery – ‘dysenterica’ .
When in need of a natural yellow dye I usually reach for Weld (Reseda luteola), which can also be foraged in July but is much harder to find. So I couldn’t resist the abundance of Fleabane on my doorstep and decided to give it a try.

Having gathered what I thought I’d need for this project, I left the Fleaband lying in the grass for a couple of hours to give the insect life a chance to find a new home.

Once I’d picked off the flower heads I had about 100g of dyestuff.

The flower heads were added to a dye pot and kettle-hot water poured over to soften the dyestuff and to kick-start the release of colour. When preparing plant matter to make paint you need a concentrated mixture, so add just enough water to cover the dyestuff but also to allow it to move freely. You'll need to use a pot that's several times bigger than the contents.
Leave the dyestuff to steep overnight and then slowly heat the contents to 80C (a gentle simmer) and hold the heat for about an hour. Then allow the dyebath to cool. To draw out the best of the colour I generally leave any plant matter to steep again overnight.

The next step is the strain the dyestuff through a muslin-lined sieve into a clean bowl.

Give the dye pot a good rinse before returning the liquid, to clear out any unwanted bits.

This is where things get really interesting!
Gloves and a mask are recommended.
For the next step you’ll need some alum (aluminium potassium sulphate), an acidic mineral salt, and some soda ash (sodium carbonate), an alkaline mineral salt - both available in handy quantities from craft suppliers.
The amount of alum needed varies according to the type and volume of the plant source being used. Dye-rich plants such as Weld require a lot more alum than most. As I'd not used Fleabane before, I was guessing that for my 100g of Fleabane flower heads I'd need half the weight of dyestuff to weight of alum, so 50g of alum.

Warm the dye bath to a tepid temperature. In a jam jar, dissolve the alum thoroughly in a small amount of hot water before adding it to the dye bath, stirring gently. You'll notice some reaction as the alum attaches to the dye particles in the solution.

You need half the amount of soda ash to alum, so 25g in this case.
In a separate jam jar dissolve the soda ash in a little warm water.
At this point it’s important to stress that the dye pot must be considerably bigger than its contents; I’m using a 5 litre pot for only ½ litre of dye.
Using a long handled spoon, stir the dissolved soda ash carefully into the dye bath. The solution will now foam up - sometimes quite dramatically!

pH (power of Hydrogen) is the international scale used to specify how acidic or alkaline (base) a water-based solution is; the H referring to the level of hydrogen ions per litre. Pure water is neither acidic nor alkaline and has a neutral pH of 7 at 25C.
The amount of foam generated by the interaction of the soda ash and the alum depends on several things: the strength of the dye bath, the amounts of alum and soda ash added and, most importantly, on creating a pH neutral environment (pH7) for an effective reaction. The aim is to precipitate out as much of the pigment as possible.

At this stage the contents can either be left in the dye pot to precipitate fully or, once the foam has subsided a little, poured into a clear precipitation jar so you can watch the magic as it happens.
The pigment, now attached to the alum, will slowly sink to the bottom of the jar.

How quickly this happens will vary. This is the Fleabane pigment precipitation after one hour ……

…… and after 24 hours. This solution is known as a ‘lake pigment’.

Once the pigment has precipitated to the bottom of the jar, leaving a clear liquid above (known as a ‘supernatant’), pour off as much of the supernatant as you can without losing any the pigment, and pour the rest of the contents into a sieve, lined with a large filter paper and placed over a bowl.

You’ll notice that the initial supernatant that filters through will contain some pigment. Pour all this back into the filter paper. Once the filter paper is sufficiently wet only the supernatant will pass through.

The supernatant will drain out overnight, leaving a thick pigment paste in the filter paper.

I generally leave the paste in the filter paper for another 24 hours to dry out a little more before spooning it into a sterilized jam jar.
The top edges drain more than the central pond at the bottom of the filter paper, which can still be quite wet. Pigment paste doesn’t want to be too wet or too dry – experience will tell you when you’ve got the right consistency.

In order to create a watercolour paint that will adhere well to paper, you need to add a ‘binder’. The one most commonly used for watercolour paint is Gum Arabic, a natural water-soluble gum from certain species of acacia tree. Agar Agar is an alternative.
100g of Fleabane flowers gave me approximately 5 tablespoons of pigment paste. Working on the basis of 10 drops of Gum Arabic to a tablespoon of paste, I added 50 drops of Gum Arabic, stirred it well and then tested the consistency on paper. Experience, and your personal preference as the artist, will tell you when you have the right texture. If you feel you need to add more Gum Arabic, proceed with caution a few drops at a time.
Adding one drop of clove oil to the jar will help to preserve the paint, and with a well-fitting lid it should keep for months at room temperature.

Looking at the test results I think the pigment paste could have remained another day in the filter paper. It was still a little too wet, but built up well in layers to a lemon yellow that I was very happy with.
If you'd like to join us on one of our in-person workshops in Mere, Wiltshire, you can find out more and BOOK YOUR SPACE HERE.