
NATURAL DYEING WITH ACORNS

Britain has two native oak trees; the English or pendunculate oak (Quercus robur) and the Sessile oak (Quercus petraea). They have slightly different shaped leaves and the acorns of the pendunculate oak hang from stalks, unlike those of the sessile oak that sit closer to the branch. They’re both deciduous and belong to the family Fagaceae, which includes beeches and chestnuts.

There are other non-native oak trees such as the Red oak and the Turkey oak which were introduced to the UK in the 18th century, but the English oak holds a special pace in our culture. Its impressive canopy and powerful presence is a familiar part of the British landscape and the oak is woven into our history and folklore. School children are told how Charles II took refuge in an oak tree to evade capture by Parliamentarian forces, and ‘The Royal Oak’ is still one of the most common pub names in England. In years gone by couples would marry beneath the boughs of an oak tree, and oak traditionally provided the Christmas Yule log.
The English oak tree has long been a symbol of power and endurance as its latin name ‘robur’, meaning strength, suggests. Its hard and durable timber was used in construction for centuries and original oak beams continue to support structures more than five hundred years old. Among other things it was used in furniture making, flooring and for wine barrels, but it was particularly important for ship building. Acres of English oak forest were felled to build Henry VIII’s renowned naval fleet and ‘Heart of Oak’ is still the official march of the Royal Navy.
English oak trees will grow up to forty metres in height but will not be mature enough to produce acorns until they’re about forty years old. They will flourish for another two or three hundred years before beginning to decline into old age, with many living far longer than that and some to over a thousand years.
English oak trees support more wildlife than any other native tree species. The acorns are a welcome food source for mammals and birds and the trees are host to fungi, lichen and hundreds of different insects. These include many species of oak gall wasp that lay their eggs in the bark or buds causing the tree to generate protective ‘oak galls’, encasing the developing larvae. In the fallen oak galls you can often see the little holes through which the emerging insect made its escape.
 Oak galls
These oak galls are rich in tannin and were used to make an intense, permanent black ink as far back as Roman times. In Britain oak gall ink was used in manuscripts and legal documents, including the Magna Carta in 1215, so much of our written history is literally preserved in oak.
 Judge Wyndham’s Oak
 History of Judge Wyndham’s Oak
Oak trees are classed as ‘ancient’ from four hundred years old, and there are many ‘ancient’ oaks in the UK. One of the biggest is The Major Oak in Sherwood Forest with a canopy spread of 28m and a trunk circumference of 11m. It’s known to be at least a thousand years old, as is the Big Belly Oak in the Savernake Forest in Wiltshire. Just a few miles from my home is Judge Wyndam’s Oak, also known as the Silton Oak, in Dorset. Standing in its shade you certainly feel you’re in the presence of something special.
 Fibres used in this natural dyeing project
For this natural dyeing project I used some naturally white Bluefaced Leicester wool. Wool is an animal (protein) fibre.
I also used four plant (cellulose) fibres: natural linen, bleached linen, natural banana yarn and some bleached cotton.
These fibres weighed about 100g in total and were scoured and mordanted before dyeing, see www.elkatextiles.co.uk for full details of how to prepare fibres for dyeing.
 Acorns being weighed
I’ve only tried dyeing with acorns once before and thought the results, at 100% WOF, were rather disappointing, so I decided to ignore everything I’d read and used 400% WOF.
WOF is the term used to describe how much dyestuff is used in relation to the Weight Of Fibre being dyed.
100% WOF would mean using equal weights of dyestuff and fibre. 200% would mean double the weight of dyestuff to fibre. There is a limit to how much dye a fibre will take up but at 400% I was giving it every chance!
 Crushed acorns
 Adding hot water to crushed acorns for steeping
After rinsing the acorns well, I crushed them in a sack in the hope of releasing more colour, put them into the dye pot and poured kettle-hot water over them. I then left the dyestuff to steep for a couple of days, by which time the dye water was turning an encouraging shade of brown.
 Heating the dyestuff
The dye bath was then heated slowly to 80C, a gentle simmer, and held at that heat for about an hour.
A thermometer is helpful, but if you haven’t got one just keep an eye on the dye bath and reduce the heat as soon as the first small bubbles begin to rise to the surface.
Overheating natural dyes tends to dull the colours. I used an electric hob and removed the dye pot to a heatproof mat from time to time to regulate the temperature. A gas hob is much easier to control.
Once the dye bath had brewed for an hour it was removed from the heat and left to cool and to steep for another couple of days. ‘The longer the stronger’, as natural dyeing wisdom has it.
 Straining the dyestuff
 Pouring the dye into a clean pot
The dyestuff was then strained into a clean pot using a sieve, lined with a muslin cloth.
Be sure to rinse out the dye pot before returning the strained solution, so you have a good clean, clear dye bath without any bits that may get caught up In the fibres.
 Adding fibres to the dye bath
It’s important that fibres are well ‘wetted-out’ before entering them into a dye bath. This means soaking them overnight to allow the fibres to expand and open up, making them more receptive to the dye. In the case of water-resistant wool I allow a couple of days.
Make sure there is enough solution in the dye bath to allow the fibres to move freely. Top up with more water if necessary. This will not dilute the dye bath as the fibres will take up the dye particles available regardless of the amount of water.
When entering fibres into a natural dye bath it’s important to put them all in at once. If you add some fibres, and later add some more, you may find that the first lot of fibres entered have taken up more than their fair share of dye particles, and the fibres entered a short time later will be paler.
It is easier to get even dye results on yarns than it is on pieces of fabric, which tend to fold over on themselves. The folds and creases dye unevenly (see blog Natural Dyeing With Nettles) so when entering fabric into a dye bath try and minimize these. With larger pieces of fabric it’s necessary to keep working the fabric around in the dye bath, and lifting it in and out to make sure the dye is reaching all surfaces evenly.
 Heating the dye bath
The dye bath was heated to 80C and held at this temperature for an hour, then removed from the heat and left to cool and to steep for another couple of days. However, if you feel you have a colour you’re happy with, you may decide not to leave the fibres in for so long. It’s a question of ‘capturing’ the best colour, bearing in mind that fibres will be several shades lighter once they have been washed and dried, than they are as they emerge from the dye bath.
 Hanging the fibres to dry
Remove the fibres from the dye bath and hang them to dry without washing. This allows to fibres to close up as they dry, retaining as much colour as possible.
 Washing the fibres
 Washed fibres in final rinsing water
Finally, give the fibres a good warm wash in a pH neutral detergent and rinse them until the water runs clear – or almost. Then hang them to dry once more.
MODIFYING
 Preparing an iron bath
 Adding fibres to the iron bath
To extend the colour range of a dye bath it’s possible to ‘modify’ fibres (alter the colour) with the use of modifiers such as iron, or acidic or alkaline solutions. (see www.elkatextiles.com). Iron is the modifier most commonly used by natural dyers, and the one used here. Iron will darken, or ‘sadden’ colours. Fibres should be fully ‘wetted out’ before entering them into a cold iron bath, and left only for a short time. Keep an eye on them as the colour will change quickly.
 Modified fibres in final rinsing water
Wash the fibres immediately. An iron modifier has the added advantage of improving colourfastness.
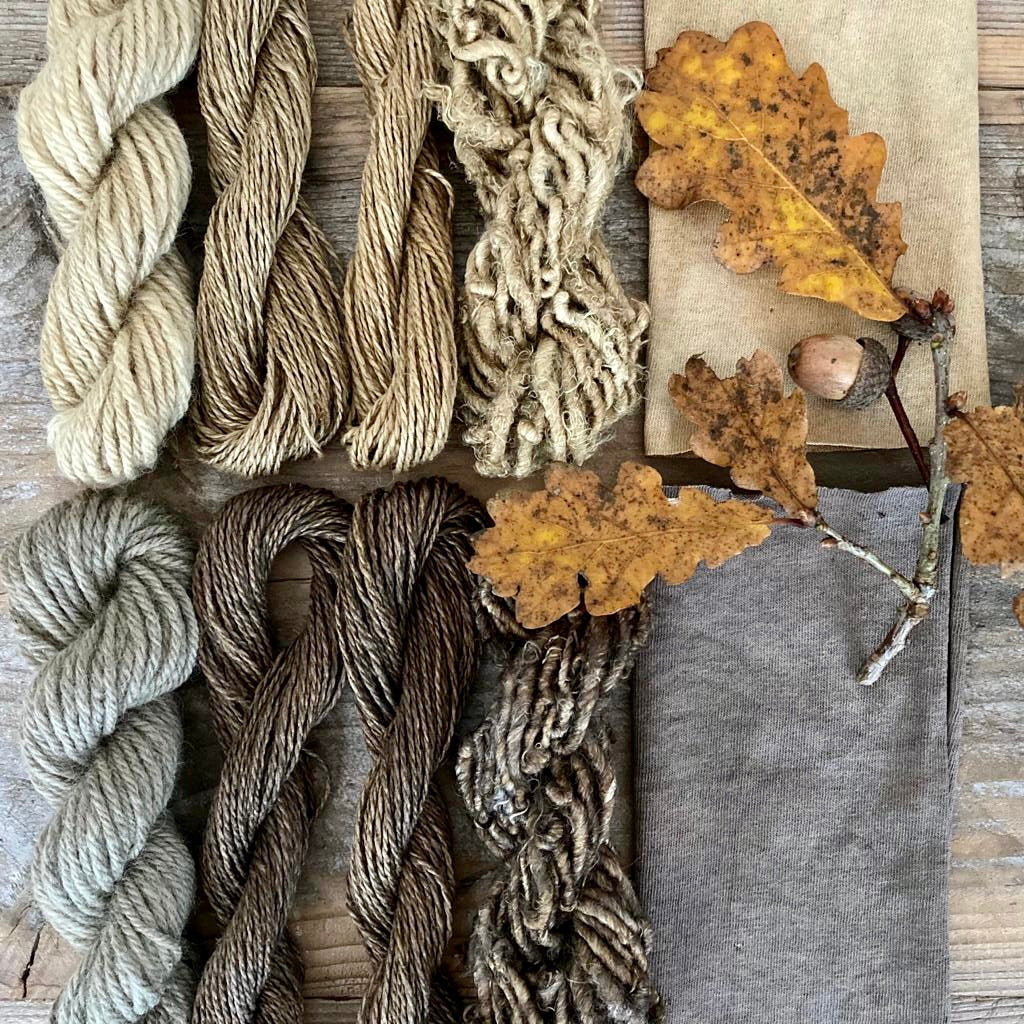
 Fibres after dyeing and modifying
I was much happier with my result this time round. As always, the different fibres have produced very different shades from a light tan through to a rich nutty brown, once modified with iron. It’s interesting that there is very little difference in shade between the unbleached and the bleached linen fibres so perhaps bleaching linen fibres is not only less environmentally friendly but also not always necessary.
References:
historic-uk.com
gardenersworld.com
woodlandtrust.org.uk
architectsdatafile.co.uk