
MAKE THE MOST OF YOUR MADDER – PART 2

If you didn’t catch PART 1 of this blog you may like to have a quick look at it before going on to PART 2 – but it’s not essential.
PART 1 gave an outline of the importance of the madder plant (Rubia tinctorum) to ancient dyeing communities and to international trade in times past, until the development of the first man-made dyes in the mid 19th century. But with current concerns about the environmental damage caused by the synthetic dyeing industry, there is a renewed interest in this remarkable natural plant dye, both commercially and to the home dyer.
Those already experimenting at home with natural dyes will know that there is no natural affinity between most plant dyes and natural fibres (they must be 100% natural animal or plant fibres for natural dyeing). A ‘mordant’ is needed to create a bond between fibre and dye and this is most commonly a mineral salt known as ‘alum’ (potassium aluminium sulphate). Details on how to prepare fabric and yarn for dyeing are available from many sources, online and off, but for a comprehensive self-paced and easy-to-follow guide with videos and printable content you might find our online course: An Introduction to Natural Dyeing, a worthwhile investment.
* As with all aspects of natural dyeing be sure to use equipment that is reserved only for dyeing and not used for any culinary purposes.
For this madder dyeing project I started with 300g of Bluefaced Leicester (6 x 50g skeins), a naturally creamy white wool reared, sheared and spun in the UK.
- West Yorkshire Spinners, 100% British Bluefaced Leicester wool, is covered by the British Wool licensing scheme, assuring responsibly sourced fleece from field to mill.

To dye animal or plant fibre to a satisfactory depth of colour with madder root you’ll need the same weight of dyestuff as fibre. In dyeing instructions this is generally noted as 100% WOF (weight of fibre). For more intense colours you can use more dyestuff, perhaps 150% WOF or even 200% WOF.
For this project I used 300g of madder root, ie the same weight as the wool, so 100% WOF.

Start by soaking the chopped madder root. I do this for at least two days to allow the woody roots to soften a little. Fill a dye pot with plenty of cold water to allow the madder root to be stirred around occasionally and to swell. Adding 6% of calcium carbonate powder (chalk) will harden the water and help to enhance the dye colour. SO: for this project:
300g madder root ÷ 100 = 3g
3g x 6 = 18g calcium carbonate
*Always wear a mask when handling fine powders.
The madder dye bath then needs to be heated very slowly to 80C, keeping it below a simmer, and maintained at around this temperature for an hour. Overheating madder will tend to result in a browner dye colour. Then leave the madder bath to steep and cool overnight.
To extract the best colour from the madder I follow the advice given to me by Debbie Bamford on a visit to her lovely dyeing studio in northern France a couple of years ago (mulberrydyer.com). For this you’ll need a dedicated liquidiser – I bought the cheapest I could find and it’s still going strong.

Blast the madder bath contents in the liquidiser, being careful not to put too much in at a time, and then strain the fibrous contents through a muslin cloth – or as Debbie suggested, an old net curtain will do.
Rinse out the dye pot so it’s clear of bits before returning the strained madder dye. At this point I topped up the dye bath to make sure there was enough liquid for the skeins of wool to move around freely, ensuring a good even dye result.
*It may seem counter intuitive, but adding more water to a dye bath does not dilute the strength of the dye. The strength of a dye bath is governed by the number of dye molecules available to be taken up by the fibre.

The well soaked (wetted-out) skeins of wool were then added to the cold dye bath which was heated slowly, so as not to ‘shock’ the wool, to 80C and held at heat for an hour before being allowed to cool and steep overnight. Moving the skeins around very gently in the dye bath from time to time helps in the even uptake of dye, but too much agitation will felt the wool.
*Wool is made up of an inner cortex enclosed by scales. These scales will open up as the wool is soaked and then heated to a temperature of about 80 – 90C, allowing the dye to penetrate the fibre.
Heating more than this risks damaging the wool and felting.
The skeins were then hung to dry before being carefully washed in tepid water with a little detergent and gently rinsed until the water ran clear – or almost. They were then hung to finally dry. The colour is always several shades lighter once the fibre has dried, but I was very happy with this first lot of skeins which dyed to a rich brick red.

Lot #201
Without doing anything more to the remaining dye bath, I added another 300g of prepared woollen skeins, heated it as before, leaving it to cool and steep overnight. The result after washing was a pretty dusky pink – so two lovely colours for the price of one!

Lot #202
I was then left with an ‘exhausted’, weak madder dye bath and the strained madder root fibre.

I put the two together and left this to soak for a couple of days before putting it through the liquidizer a second time. It was then heated and strained as before and another 300g of prepared woollen skeins was added to this recharged dye bath. This was heated, cooled, dried and washed as before and I was quite surprised by the vibrancy of the resulting bold coral shade.

Lot #204
Encouraged by the strength of this now three-times-used batch of madder I decided to give it one more go! By adding the remains of the madder dye bath to the remains of a previously used weld dye bath (yellow) I was able to dye another 300g of wool a delicate shade of apricot.

Lot #205
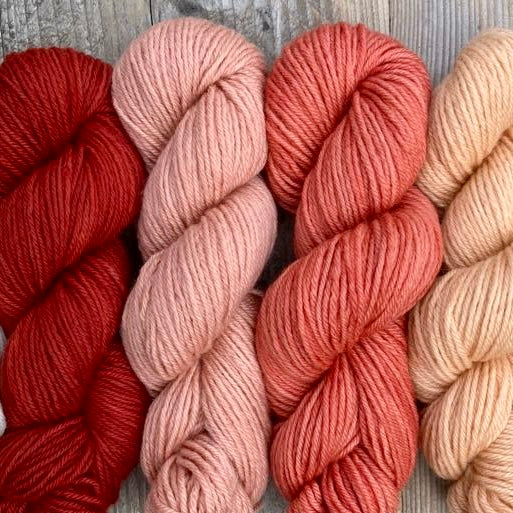
SO: a total of 1200g of yarn dyed to four distinct but harmonious colours with 300g of madder root, and a little left-over weld.

Left – right:
- Original, undyed Bluefaced Leicester DK wool
- First use of madder dye bath – Lot 201
- Second use of madder dye bath – Lot 202
- Remains of above madder dye bath plus re-liquidized, heated and sieved madder root fibre – Lot 204
- Remains of Lot 204 dye bath plus an exhaust weld dye bath – Lot 205
Madder, it seems, just goes on giving!
Click here to see our current range of naturally dyed wools go to elkatextiles.com